Friday, 29 June 2012

What's in my travel makeup bag?

Hello everyone! I'll be heading over to Forest today for 3 nights, so I thought to share the things that I've packed for this trip.


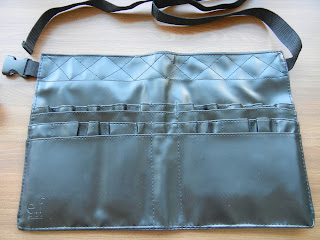
This is what it looks like inside

I got this Quo cork makeup bag from Shoppers Drugmart awhile ago for only $5 :). It's quite spacious and there are some slots on the side to hold my brushes.


I like this travel brushes because it contains most of the eye brushes that I would use! It actually also has a blending brush included but it's now being used.


FLTR: Spoolie, MAC Pencil Brush; Sigma E40; Elf Complexion Brush; Elf Powder Brush; Sigma F80

I also like to carry some extra brushes just in case! Sigma F80 is a must for foundation application.


ZA 2 Way Brightening Powder; Revlon Photo Ready in Nude


Kiss Nude Lipstick in 02; Etude House Pink/ Red Lipstick

Kiss lipsticks are super glossy and taste nice (don't eat it!). I bought it in Japan from Loft. The prices are quite high for a drug store make up therefore this is the only product I have from them.


Canmake blush in PW19; NYC Bronzer in Sunny


Biore UV Aqua Sunscreen; Maybelline Falsies Mascara

I'm really liking the mascara so far! It's performing really well compared to the others that I own and it does not require much work for full looking lashes. Though I wouldn't say that my lashes look like falsies.


Everything!

I like to bring the Smashbox Photo Op Mega Palette for the face and eyes since it can create looks for all occasions!

I have to be honest that this is quite a lot that I'm carrying with me for a trip. There are times when I will only bring a sunscreen, an eyeliner, and a powder foundation and out the door I go. 

Happy Canada Day long weekend for everyone in Canada and for the rest of the world, enjoy your weekend. 

See you tomorrow for the ELF Flawless Finish Foundation review.


Thursday, 28 June 2012

Essie's Nail Polish Review

Hello there! I wanted to do a make up tutorial today but things didn't turn out so well. I went to the optometrist today and she had some eye drops to dilate my pupils. As a result, I couldn't see properly for several hours. Although it's a bit better now, but I have to say typing this isn't as easy as you think! I'll share some pics of my dilated pupils at the end of this post.

Today I'm here to share some Essie nail polishes that I own and a swatch of them. These are the only ones I've tried from them and I'm very impressed so far. I have heard that some of their polishes are a miss, so if you're thinking to pick up some, maybe you can consider the ones that will be mentioned below. :)


Small collection of Essie nail polishes

I have to admit that I've tossed out A LOT of nail polishes last year when I packed to move over here. Some are old and some are just not worth to ship half way across the world. Yoshi bans me from buying new ones unless I clear the old ones in return. Nonetheless, I still have quite a bit of them (hidden haha) and he doesn't need to know about it!


FLTR: Lights; Camera; Action


FLTR: Jumpin Junkanoo; Plumberry; Alligator Purse


FLTR: Nutmeg; Trophy Wife

My favourites from all these are:

Camera - The best neon peachy pink out there
Alligator Purse - The only colour that I can find that looks like ketchup!
Nutmeg - Perfect nude nails for all occasions

Below are the swatches with flash and without flash.


Top FLTR: Lights; Camera; Action
Bottom FLTR: Nutmeg; Jumpin Junkanoo; Plumberry; Alligator Purse; Trophy Wife


Same as above

For the summer I'm absolutely diggin' Lights, Camera, and Action as they are so neon! If you want them to appear more vibrant than they already are, try applying a white polish underneath and then this on top. 

Anyways, to end today's blog post, here are some pictures of my dilated pupils.


looking tired from squinting too much


Dilated pupils + smudge eyeliner (Physicians Formula gel liner)

Thank you and see you tomorrow for "what's in my travel makeup bag"!

Wednesday, 27 June 2012

Revlon Photo Ready Compact Makeup Review

Hi there! Today I'm sharing a product that I think everyone should give it a miss if you have been thinking about it.


Revlon Photo Ready Compact Makeup in 200 Natural Beige

To be honest, I purchased this several months ago and did not use it. I bought it when I was still living in Sydney and took it over with me to Canada. I really should've save the space for something else instead!!!


Before


After

I have to apologise that the first picture is rather dark. However I didn't bother to take more because this product really didn't do anything!

I have red spots on my face from time to time and this product does absolutely nothing. The texture of the foundation is mousse like, it has a layer of net that apparently "liquifies" the product for complete coverage and superior blendablility. 

I applied it using a flat foundation brush, although it blends quite well and feels light, but my skin actually looked very similar to before. Also it has no staying power, an hour later my skin looks exactly the same as if there was nothing on it.

To summarise -

Pros: 
  • Light weight
  • Matte finish
Cons: 
  • Absolutely no coverage
  • No staying power
  • Pricey - most of the Photo Ready range are a little bit expensive but this product is definitely not worth your money
That's all for today! I hope this review helps some of you out there.

Tuesday, 26 June 2012

Bold Pink & Gold Makeup Tutorial

Happy Tuesday! I bet everyone in Canada is looking forward to the long weekend ahead :)

I'm going to share a rather bold and colourful look today. Perhaps this is not your everyday look, but it's certainly good to experiment with some different looks once in a while!

Complete Look

Start off your face with some moisturiser. For this look, I recommend to apply the foundation and concealer after since it will have some fall outs from the eyeshadows we are going to use today. Feel free to substitute any colour or product with what you own. You don't have to go all out to purchase the exact same thing!


Prime your eyes with Too Faced Shadow Insurance and then use NYX Jumbo Eye Pencil sparingly. The white base will enhance the colours we will be using later. Blend out.

Apply white base for the colours to pop!


Gold eyeshadow; Boujour gold eyeshadow pigment in 02; Sigma E55

I used 2 different gold and overlay each other to create the tone I desire. Apply only on the centre of your lid.

Gold on the centre is the lid

Dark pink eyeshadow; Sigma E25

Use the blending brush with a dark pink colour and blend across your socket. Since I don't have a defined socket, I placed it where it looks best.

MAC Beauty Marked; Sigma E30 Pencil Brush

Use a dark purple or black with a pencil brush to define the outer corner of your eyes. This will make your eyes stand out. 

Like that!

Use the same pencil brush and the purple colour to line the outer part of the lower lash line. Choose either one of the gold colour we used before to highlight the inner corner and inner part of the lower lash line. 

Blend out the eyeshadows using a clean blending brush. Feel free to reapply any colour that faded during blending.

MAC Black Track Fluid Line; Furless Eyeliner Brush

Tight line with Mac's eyeliner.

Maybelline Falsies Mascara; Maybelline Master Precise Eyestudio Eyeliner


Almost done..

Apply mascara and you're done with the eyes :)

Close up

I used a bright pink lippie as it works best for this look.

Victoria Secret's Beauty Rush Glossy Lip Tint


Sigma F40 Brush; NYC Sunny Bronzer

I chose to use the bronzer to contour and also as a blush. This bronzer is suitable for that as it is rather light.

Complete look close up

Complete Look 2

Thank you for your support and see you back here tomorrow :)

Monday, 25 June 2012

ELF Haul and Mini Review

Hello there! Today I'm here to share a haul and short review about some of the great deals I've picked up last week from ELF Cosmetics. It is a company that sells quality products at affordable prices, offers all the beauties in the world to become more beautiful!!

The website always have some sort of discount or deal going on, so subscribe to them so you'll be the first to know when things on sale!

I'm going to share what I've picked up for $59.95 (including shipping) and some swatches!

First and foremost, I'm going to show you the freebie set worth $21. I received an email about it but I think this particular offer is over for now, however they are running some other exciting ones too! If you still want to try, the code for this deal is SUNKISSED.

Freebies!!!!

Freebies include a pouch, lotion wipes (I don't like the scent), waterproof mascara, lip shine, all over stick, cream shadow, nail polish, eye primer, and a smudge brush.

Now move on to the products that I actually purchased.

Luscious Liquid Lipsticks FLTR: Strawberry; Raspberry; Baby Lips

Although the colours are not as pigmented as an actual lipstick, the payoff is decent. It has a great peppermint scent and taste. Does not feel stick at all.

Studio Glossy Gloss FLTR: Wild Watermelon; Sweet Salmon

Again, great peppermint scent and not glossy at all! Perfect shine on your lips!


This is the first time I bought the smudge brush so I can't give much comments about it. On the other hand, I'm a loyal user of their studio powder brush and these 2 are back ups! They somehow feel slightly different to the one that I bought about 2 years ago.. Not in a bad way, just different.


Studio Baked Blush in Passion Pink

Surprisingly nice as a blush or highlighter for the darker skin tone. Looking forward to try more, though I already have a lot of blushes. Ohh noooo!


Looks great but since I have not use this product yet, I'll get back to you about it when I can!


I've actually heard many good things about this product so I decided to give it a try. Check out a complete face tutorial using this foundation here. I like the finish of it, feels light and decent coverage. Although this colour is a close match to my skin, there is still a slight bit pink undertone in this colour. I will definitely do a full review about this foundation.

Last but not least...


Many professionals had given good reviews about this particular brush belt and I can see why! It is well made, sturdy, and easy to clean. I look forward to use this during freelance make up!

Please leave a comment if you wish to know more about a certain product or my experience with the company. Otherwise I'll see you tomorrow back here :)

Sunday, 24 June 2012

Easy Pin Up Look

I hope that everyone had a great weekend! We finally head to watch Madagascar 3 yesterday :) I now have Afro Circus song as my ringtone!

Today I'll be sharing some tips to create an easy pin up look! It doesn't require much effort or a lot of time to complete this look. It took me about 20 minutes including taking pictures for the blog.

Finish Look

First and foremost, start with your primer or sun screen as you wish. Today I used Elf Flawless Finish Foundation for the first time with my Beauty Blender. 


For a more natural finish, remember to always wet your sponge (and squeeze out the excess water) prior to foundation application. This will help your make up to blend more easily and less likely to look cakey.

BEFORE Foundation

AFTER Foundation

Like usual, tight line (I used MAC's Black Track Fluid Line) and apply eye primer. 


Start off with applying a light shimmery peach colour across your lid, focusing on the inner corner and centre of the lid. Use the eye shading brush for this step.

Shimmery Peach Eyeshadow

Use the blending brush with a matte dark brown colour to blend lightly across the outer corner and drag the colour inwards just a slight bit. After, use eye shading brush with the same matte brown and line on the outer corner of the lower lash line.


 Clean the brush with a towel/ tissue, use a shimmery beige colour and highlight the rest of the lower lash line. Blend with fingers on the lower lash line.


Slight wing cat eyeliner + mascara

Line your eyes using a stiff tip liquid eyeliner for easier winged eyeliner application. Apply mascara.


Bobbi Brown Lash Glamour Extreme Lengthening Mascara

Contour the sides of your face and the bridge of your nose using a large stippling brush and  a matte bronzer.

MAC 187SE Brush; NYC Sunny Bronzer

Apply a peachy blush on the apples of your cheeks and blend out. 

Benefit Coralista Blush (tester size); Sigma F40 Angled Brush


Before Lipstick

Apply your favourite red lipstick and there you go!

Revlon Colorburst Lipstick in 080 Coral

Finish Look

Thank you for your time and see you tomorrow!