Wednesday 14 August 2013

Easy Soft Pink Makeup Tutorial

Hi there! Today I'm back with a soft pink makeup tutorial.

I am currently still trying to play with the camera settings to get colours to show up properly.. so apologies if it seems a little bit off! I will keep trying!


Here's the complete look

First and foremost, prime your face with your favourite primer to prevent your makeup from slipping and sliding down the face throughout the day. Here I used Laura Mercier Oil Free Primer.


Before


MAC Paintpot in Fresco Rose; YSL Teint Resist in number 5

Create a natural looking canvas for the rest of the makeup. Prime your eye lids with a pink tone base in order for the shadows to adhere better.


Coastal Scents 42 Colours Shadow and Blush Palette


Pink
Use a light shimmery pink and pat it all over the lid.


Maroon and Orange-red

Use the maroon colour and lightly shade the outer corner. With orange red, go across the upper lash line as if you are lining your eyes (I recommend to use a small shader brush or angled liner for this part).


Tight line your eyes!


This is what the colours will look like at this point...


With a light brown matte shadow, contour the eyes where the socket would set in. You can skip this part if you find it unnecessary.


LORAC Front of the line Pro Liner in Black


Line your upper lash line

As you can see, the brown gives the eyes a bit of dimension.


Using the blush from the same Coastal Scents palette (2nd from left; top row), lightly dust across your cheeks.

Matte Pink Blush

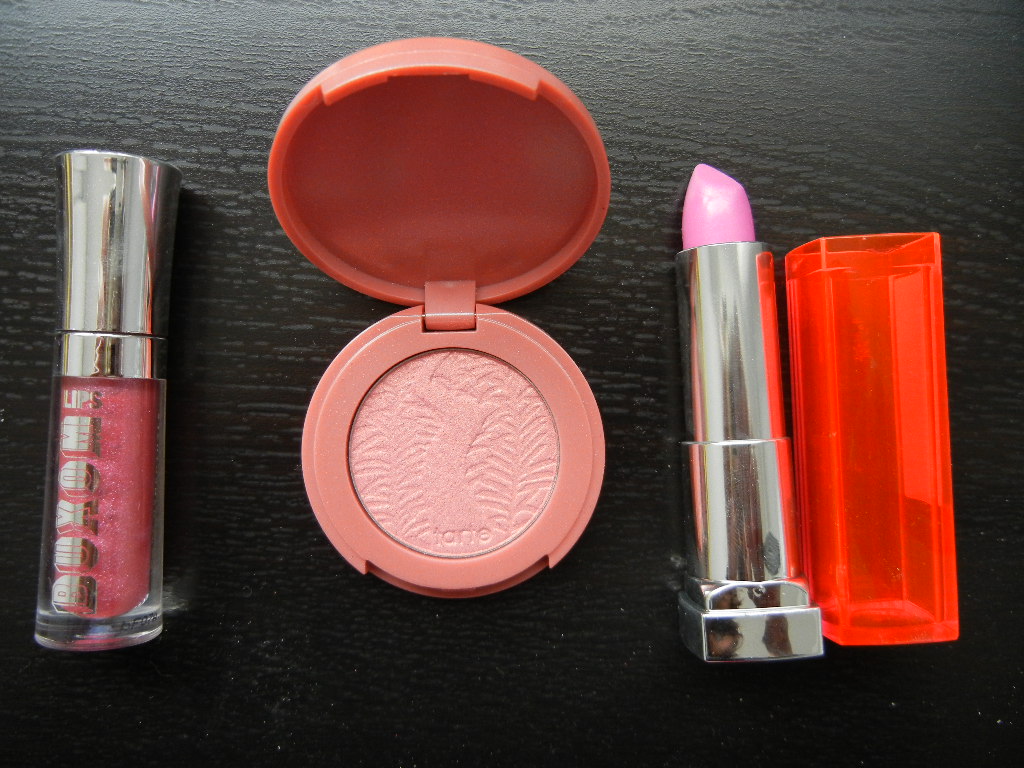
Finish your look with a pink-purple lipstick! :)


Maybelline Vivids in 860 Pink Pop


Finish look

There you go! This look is suitable for a date night out to movies or dinner :)

Have a great week!

Friday 26 July 2013

Buxom Big & Healthy Lip Stick vs ELF Matte Lip Colour

Hi beauties! I'm finally back in the blogsphere and will try to update consistently!

For the past few months I've been really enjoying lip products that are easy to use and long lasting. Since my lips aren't particularly big, I find that lip sticks that are in pencil forms to be extremely convenient! I could line my lips and fill in with no problem.

Here are 2 comparable products!


Buxom Big & Healthy Lip Stick in Nuntucket (discontinued colour) & Barcelona


Swatches

Buxom lip products are slightly minty and they make your lips feel tingly upon application. I personally enjoy that feeling but it might be a problem with some people.

This product is long lasting and has a good selection of colours. Unfortunately they are slightly expensive at $19 a pop. If you are on a budget, I suggest you to look at....


ELF Matte Lip Colour in Rich Red, Tea Rose, Coral & Nearly Nude

At $3 a piece, you can't go wrong! The pigmentation is amazing and they last as long as the buxom lip sticks! 


Swatches

I  love the Coral (3rd from the top) colour as it gives my yellow undertone the perfect nude lips. The lip sticks are non drying and have no flavour or scent or tingly effect upon application.

A comparison of the nude colours.


FLTR: ELF Nearly Nude; Buxom Nuntucket; ELF Coral

The colours are really similar but Nuntucket can look a bit dry on the lips. However all the colours for Buxom seem to vary slightly in their formulation, where the Barcelona (deep red) colour is actually much more moisturising.

If you worry that the tip is not pointy enough after some use, fear not! Both the brands include a sharpener at the end cap of the pencil.


They are the same size

If you are in a market for lip pencils or sticks, try them out :D I'm sure you'll be pleasantly surprise on how easy they are compared to the standard lipsticks!

Friday 5 April 2013

Le Rouge Givenchy Lipstick Review

Hi all! Happy Spring time! Although it is still extremely cold and windy over here, but a lot of places are starting to warm up for sure!

I tend to wear brighter clothing and brighter lip colours as the weather turns warmer. Vibrant colours make me feel happier :) I was lucky enough to receive some products from Givenchy for the season and I would like to share about them with you guys!

Givenchy Le Rouge

The lipstick came in this cute tiny paper bag with 2 mini keychains! I loveeee them! The lipstick keychain is now hanging out with my house keys. :)

Mini lipstick!

Le Rouge in 301 Magnolia Organza

There are 17 colours in this collection ranging from neutrals to brights. The colour that I have here is a bright fuchsia pink and looks absolutely amazing with all skin tones!

The lipstick is packaged in luxurious and soft black leather, a material that made an iconic presence in Givenchy fashion shows.

The lipstick is extremely pigmented and gives a creamy finish on your lips. Even if you don't have the habit of lining your lips, it does not bleed. It wears well, although not extremely long lasting, but you will only need to touch up once during lunch time for a full day of wear.

Me wearing the lipstick

The picture definitely does not do the lipstick any justice! It is much more vibrant in person that it looks on the picture. 

They are sold exclusively at Sephora, so do drop by and try them on! They really do feel amazing on the lips.

Thank you for always supporting my blog! :D

Thursday 7 March 2013

Lancome Subtil Palette Review (Peche Savvy)

Ever since I tried the Lancome's Teint Idole 24h Foundation, I've been extremely satisfied with their products!

I was able to pick up one of the Blush Subtil Palette from the spring makeup collection. There are 3 colour sets in total and I feel that this particular one has the most unique blush colour.


Lancome Blush Subtil Palette in 158 Peche Savvy

For a price tag of 45CAD, I think that this is so much more worth it than the UD Basics Face Palette!! 


The bronzer/ contour colour is matte and the blush gives a beautiful sheen rather than glitter everywhere. 


Before blush/ contour/ highlight


After


Closeup

The blush is amazing! It gives the face a perfect youthful look and suitable for all skin tones! 

I used the bronzer to contour the sides of my face and nose. Highlight at the top of the cheeks and nose bridge. 

I LOVE THIS!!!! I highly recommend this to all of you who are in the market for some blush bronzer palette type thing. I can see myself using this and abandoning my other products.... for awhile at least!

Thank you for reading! See you again soon :)

Monday 18 February 2013

The Balm "Balm Jovi Rockstar Palette" Review


Hi all! I'm back today with a short review of the Balm Jovi Rockstar Palette from The Balm cosmetics. 

After all the hype on the internet and YouTube, I decided to give it a go when I popped by Rexall Pharmaplus a few weeks ago.


Here is a look that I came up with using the palette. The more vibrant eyeshadows and lip colour are from another brand. I'll include the list at the end of this post.


Swatches

The eyeshadows are very buttery at the touch of the fingers. However I find it slightly powdery when picking up with an eyeshadow brush. If you tap off the excess before application it will be all good :) 

Pigmentation is great on both the darker and lighter colours.


Top: Lip and Cheek Tint
Bottom: Highlighter and Blush

The highlighter and blush are extremely pretty on. Despite the names on the palette, those are the exact same colours as their popular Mary-Lou Manizer and Fratboy Blush. What a deal! 

The lip and cheek tint are average, nothing to rave about. Although it is nice that those 2 products are sealed separately, that way the powder products will not get on them so easily.

Overall I do like this palette and I do feel that it can compete with higher end eyeshadows that you can find in Sephora. 

You can find The Balm cosmetics in selected Rexall Pharmaplus in Canada. 

As promised, the other products that I used to complete the look above.


Wet n Wild Palette in I'm Feeling Retro


Buxom Lipgloss in April; Tarte Blush (sorry I don't remember the name!); Maybelline Pink Pop


Thank you for checking out my blog and have a wonderful week ahead!

Saturday 26 January 2013

Quick & Simple Makeup Tutorial

Hi all! Today I'm sharing a quick and simple makeup tutorial for on the go. Feel free to substitute your own favourite products with what I'm using here :)


Firstly, make sure your face is clean and have your hair pinned up! It's way too annoying to have one hand holding your hair and the other one putting on makeup.

Put on your favourite foundation, tinted moisturiser, or BB cream!

BEFORE

Essence Stay All Day Long Lasting Eyeshadow in 02 Glammy Goes To; Physicians Formula Shimmer Strips Eyeliner in Black

For a quick and easy look, I like to use a shiny base to give some texture to the eyeshadows that I will be layering on later. This particular brand is super cheap and long lasting. It does not crease at all on my oily eyelids!

I like to also tight line my eyes to create fuller looking lashes. 

With the eyeshadow base

Tight lined!

Moving on to the eyeshadows..

Laura Mercier Palette (no box, no name, sorry!), Blending Brush, Eye Shading Brush

With the colour "Cafe au Lait" use the eye shading brush and pat it all over the lid. Don't worry about it looking messy!!


As long as you keep it approximately the same height it will be fine.

Use colour "Vanilla au Lait", with the fluffy brush, blend out the harsh line. Blend until you can't see a stark finish between the eyeshadow and your eyebrows.

Use the "Sunlit" colour and with the same eye shading brush, pat the colour in the middle of the eye.


This will give your eye some dimension and shine. Good for those who are not into super bling eye makeup.

Here I am using the Dolly Wink and Love Liquid Liner. They are both very similar and very easy to use. 


Begin with the outer part of your eyes then slowly move in. 


Easiest way is to keep your liner horizontal, that way your line is straighter.


With the brown colour liner, draw small "lashes" on your bottom lash line. If you have much more hair than I do (sigh, pathetic asian lashes), please feel free to use a mascara instead of faking it like me. 

Should look like this :D

Too Face Chocolate Soleil Bronzer; Tarte Amazonian Clay Blush in Fantastic

Apply the blush about 1-2cm below your eyes, contour your face in the hollows below your cheeks and the sides of your nose.

Close up

If you feel like your face is too powdery looking, fear not!!

Too powdery???

Use a toner, spring water, MAC Fix +... the list goes on and spray it on your face! Careful not to have a wet spot. Just make sure your face is covered lightly with the spray and pat it away with your hands.


MAC Fix +

To finish off the look, coat your lashes with your favourite mascara and top it up with a lip stick of your choice.

Maybelline Color Whisper in Pin Up Peach

Here I am using this colour because it looks natural and feels like a lip balm.

Once more, complete look!

This shouldn't take too much time, and if you substitute with what you're used to, it will be much faster too.

See you next time! :)