Showing posts with label benefit. Show all posts

Saturday, 15 September 2012

Simple Look with Red Lips

Hi all! I'm doing a simple look today featuring a bright red lip, suitable to day and night! :D It should take 5 to 10 minutes to complete this look.


Hiiiii!

Begin your face with a some sun screen, foundation and nicely filled in eyebrows. Some people prefer to do the eyebrows after the eye makeup, but I usually stay with the same brow shape that's why I like to do this step first.

YSL Teint Resist Long Wear Oil Free Foundation in 5


Begin your eyes with an eyeshadow primer. In this case I would choose one that has shimmer in it.

Essence Stay All Day Long Lasting Eyeshadow in Glammy Goes To...

Like so

Like usual, tight line your eyes with an eyeliner that does not smudge and oil/waterproof. I used to use the MAC Blacktrack Fluidline but lately I've been using the Physicians Formula eyeliner pencil to save time.

Physicians Formula Eye Brightening Eyeliner (I'm running out!)

Close up

Tight lining makes your eyelashes appear fuller and gives the eye a more "awake" look.

UD NAKED Palette in colour Sin

Using a light shimmery colour with a fluffy brush, go across the eyelids in a windshield wiping motion.

UD NAKED Palette in colour Buck

With a matte brown colour eyeshadow and a pointed brush, lightly contour the outer corner of your eyes. You can choose a darker colour if you with to create a more dramatic look.

Progress so far..

Here comes the hard part! Winged eyeliner! Use a pencil liner to sketch a line first if you feel uncomfortable going in with a liquid liner straight away. Remember to always pick a liquid liner that is stiff to ensure more control.

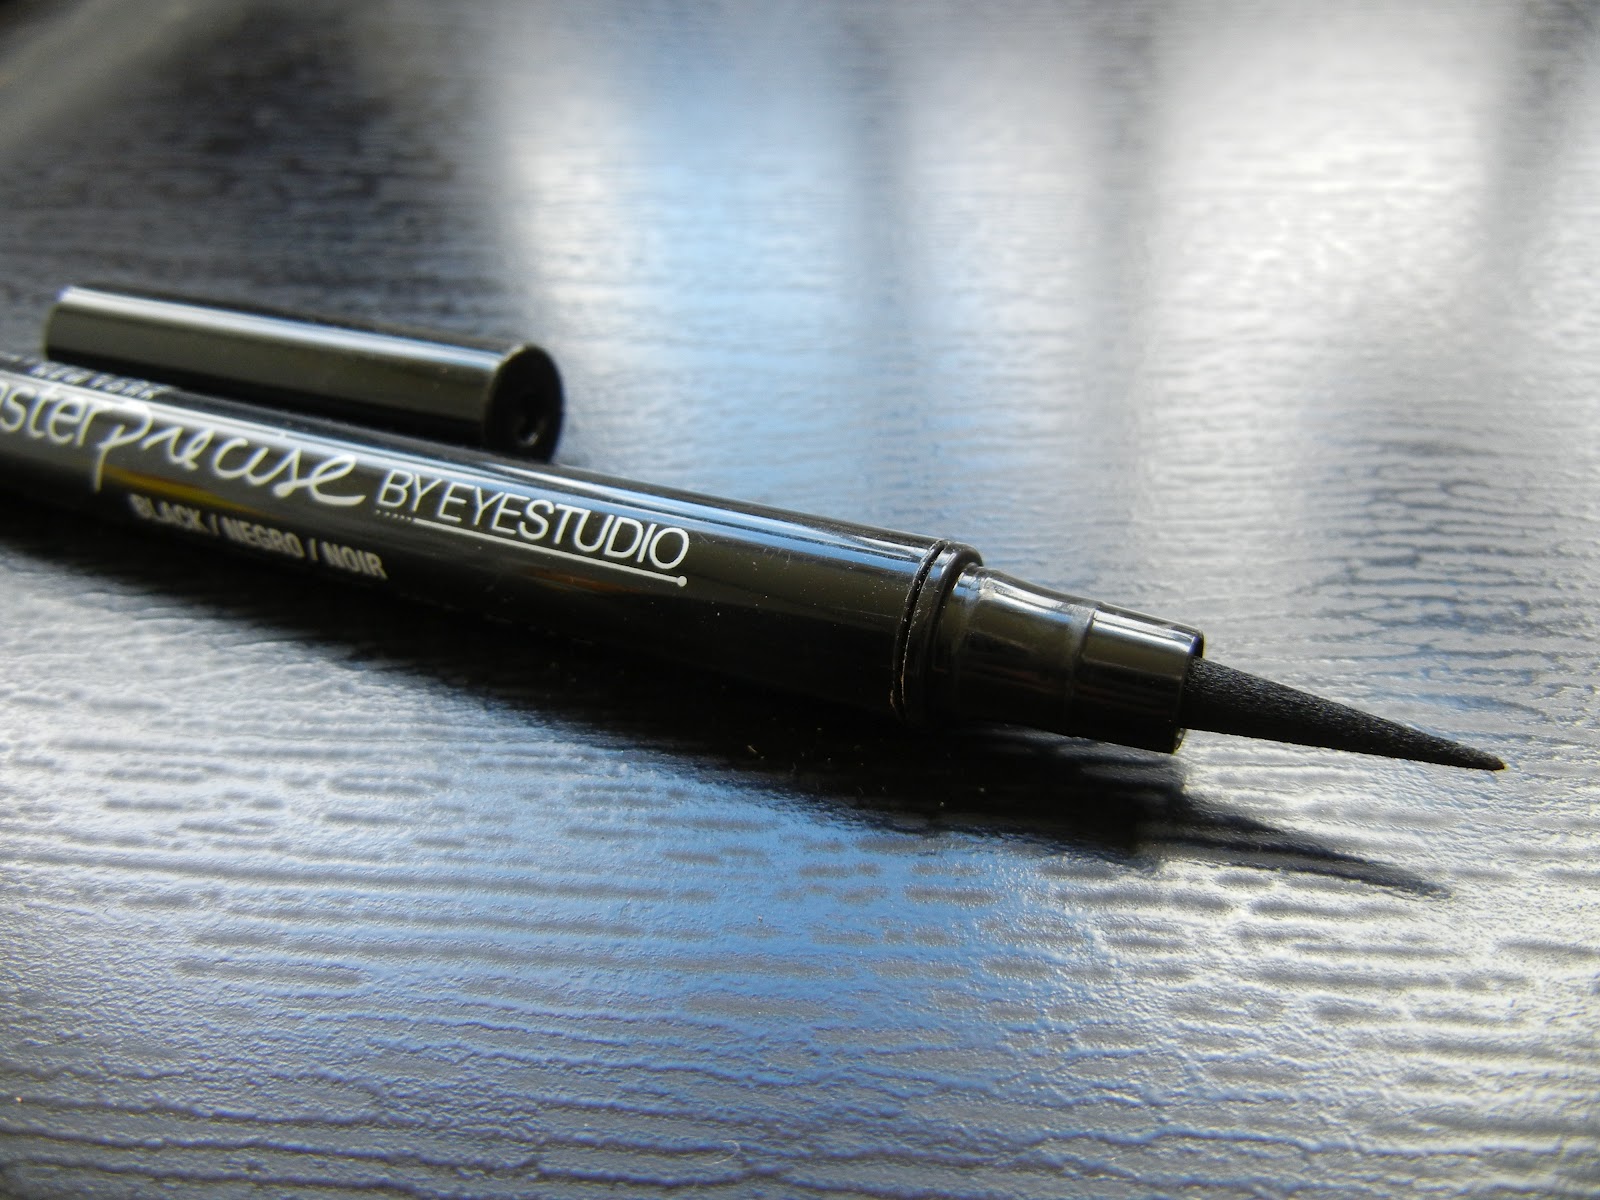
Maybelline Master Percise EYESTUDIO Eyeliner

With eyeliner

Draw the outer part of your eyes first and then the inner part. Make sure the eyeliner is thin in the inner corner. If you have bigger eyes than I do, feel free to go thick on the eyeliner.
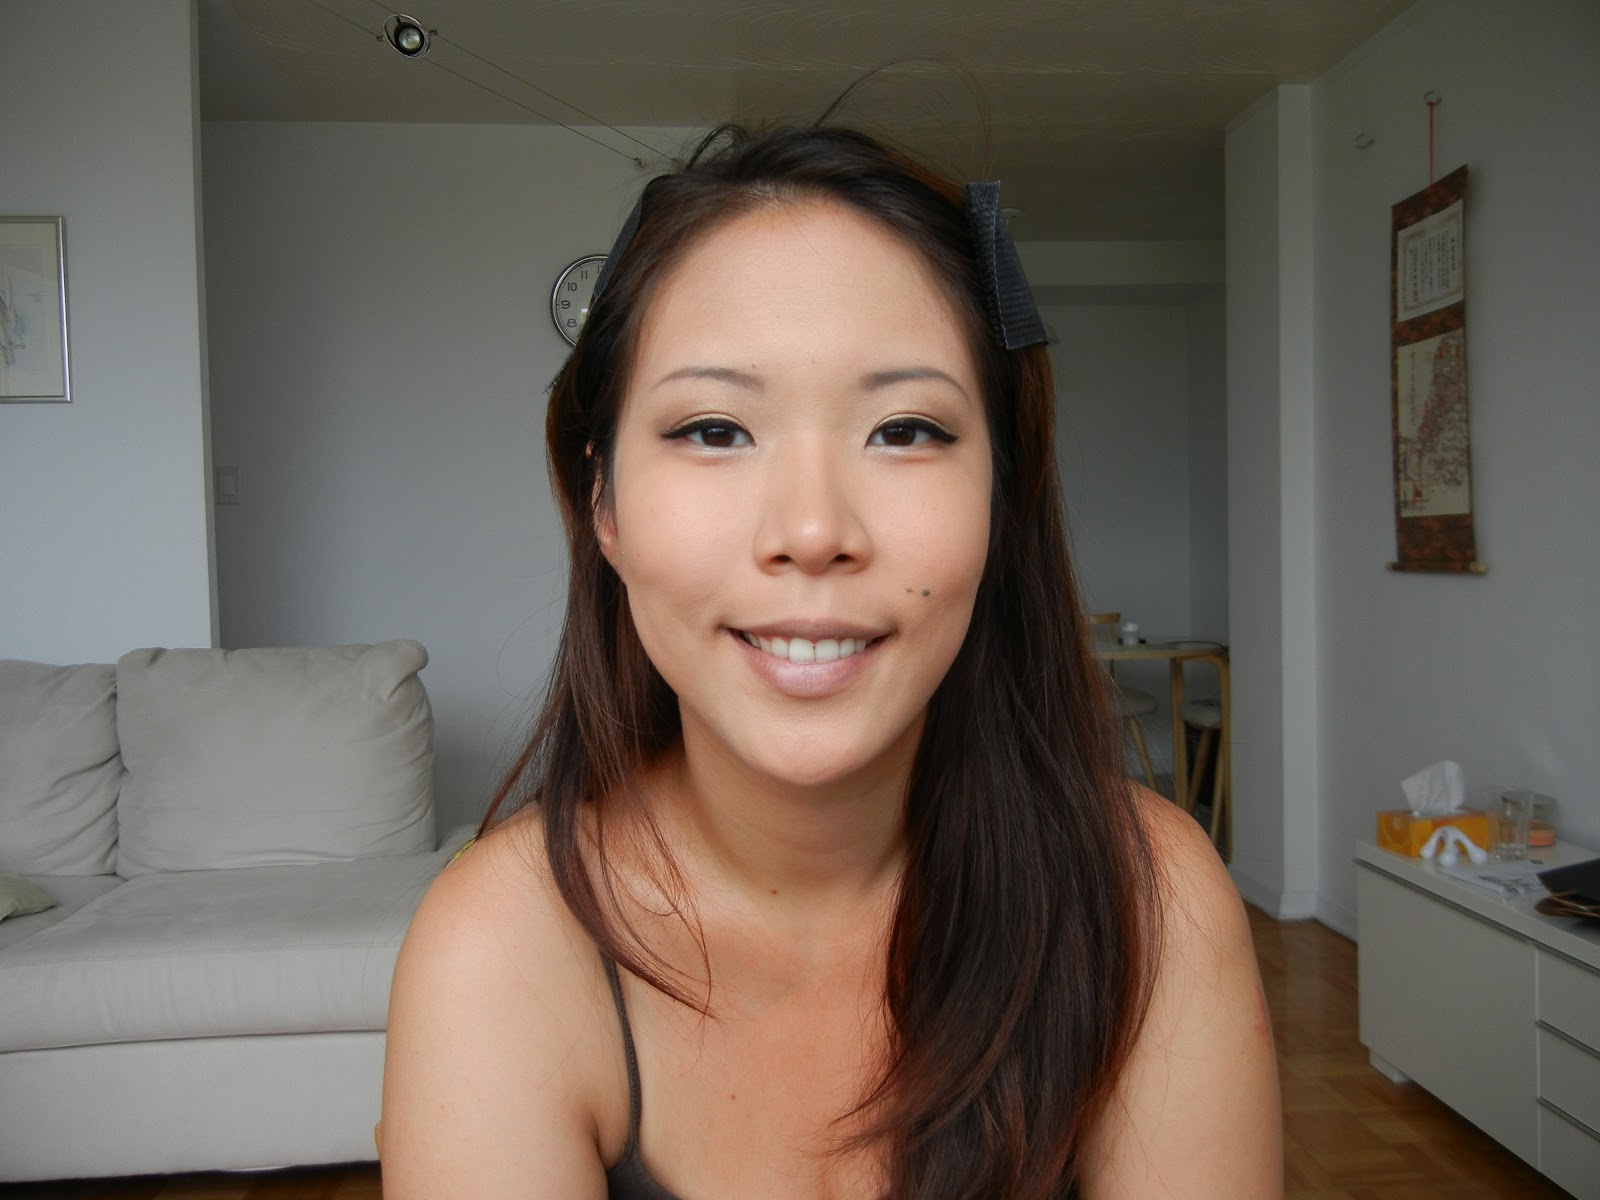
Hello!!

YSL Rouge Pur Couture in colour N.1

This colour is surprisingly long lasting!

Benefit blush in Coralista

For a look like this, I recommend to go peach on the cheeks. Or bronzer as cheek colour would work perfectly as well!

Complete look!

Here are some other red colours that I would recommend to go with this look.

Back row: Rimmel Kate no.12; Revlon Colorstay no.375
Front row: Revlon Colorburst no.080; Rimmel Kate no.10

See you soon and have a great weekend!

Monday, 20 August 2012

Benefit How to Look The Best at Everything Review - Light

If you have checked out my recent Sephora Haul, you have already seen me featuring the new Benefit How to look the best at everything kit in colour Light. Although I have some other Benefit products, but this is my first time using all the products in the kit. It is a great deal if you just want to try them out!

How to look the best at everything!!

And I'm sure you want to be the best - ALWAYS! 

BEFORE

As usual, this is my bare face! From now on I'll be filming and blogging from the bedroom because my lovely husband kindly bought and set up the new workspace for me :)


The inside

This kit cost $30 and in it you'll get a Porefessional (7.5ml), Hello Flawless Oxygen Foundation in colour Cheers to Me Champagne (7ml), 2 Boi-ing concealers in colour 01 and 02 (2x1.5g), Hello Flawless Powder in colour Me, Vain? Champagne (4g), and a small brush. 

Benefit POREfessional

I was surprised that the Porefessional is tinted, however the colour does not show through upon application. It's meant for covering up areas of the face with large pores. I applied this with a light hand, dabbing motion on my inner cheek area where I have some larger pores. I have to say that I see no difference in the pore size or the finish of my skin after the product. 

This base has a slight scent, nothing too crazy. It leaves the skin feeling smooth.

Hello Flawless Oxygen Foundation in "Cheers to Me" Champagne

I used this product with my F80 Sigma Flat Top brush to buff it out. This entire kit is slightly too fair for my skin, though the Medium one might be too dark.. which I won't be able to use during the long cold months here in Canada. Hahahahaha...

The foundation has light to medium coverage. Suitable for daily wear in low humidity.


After POREfessional and Hello Flawless Foundation

As you can see, my skin still looks fairly red and you can see some redness and freckles on my cheek area.

Next up I'll be covering up some dark circles and redness around the face.

Boi-ing Concealers in colour 01, 02

I have been wanting to try Benefit's concealers for ages cause I have heard SO MANY good things about that. Both the Boi-ing and Erase Paste has fairly good reviews. I used only colour 02 on my face.

The concealers are more dry in texture and definitely covers well. However to use it under the eyes, you will have to moisturize your skin very well before the concealer. I didn't, and I noticed a lot of fine lines!!!! (I'm not even 24 yet!!! T.T)  

I finish my skin with an overall application of the powder. The powder is lovely and it's the best thing in the kit after the concealers!

Close up!

Overall I think that this is a good value and you are able to pick it up at Sephora for only $30. Keep in mind that the sets seem to have darker shades than they labeled it as, and there are only 3 different kits to choose from. 

Tadahh!

If you are interested in what I bought during my trip to Sephora, check out the video!!


Thank you and please leave a comment if you would like me to try out any products for future reviews!

Tuesday, 14 August 2012

Sephora Haul

Hi all! I hope everyone had a great weekend! Yoshi and I were lucky enough to be able to visit our families and went star gazing during the weekend. Unfortunately the weather in Toronto and surroundings are not so great.. so we only had about 30 mins of meteor shower watch until the clouds covered the sky again.

I was feeling a little bit discourage today and decided to head to Sephora to check out if there are any new products that interest me! Please click on the video for my haul! I'm including some swatches here for some of the products.

Link for my haul video: http://youtu.be/YuAHhWIPnN8?hd=1


YAAYYY for great deals!


Tokidoki Arte Palette $4

This is decently pigmented and super great deal now! They have this palette in another colour but unfortunately it is out!

Tokidoki Inferno Bronzer in Diavolina $8

I'm impressed on how smooth the powder is to touch!!!!! Hopefully it will turn out great!

Sephora Lip Sampler $30

This is the bomb! $30 for 6 products and some are full sized! Totally worth the deal!

Sugar Rose; Hourglass Child

Sephora Precious Pink; Bite Vintage

Tarte LipSurgence (not in box, coral) Joy; Tarte Hope

I'm extremely excited to be testing these products out! Grab yourself some before they run out at Sephora :)

I'll be doing more videos from now on so please subscribe to AivysBeautyAdventure for more beauty hauls and tutorials!

Sunday, 24 June 2012

Easy Pin Up Look

I hope that everyone had a great weekend! We finally head to watch Madagascar 3 yesterday :) I now have Afro Circus song as my ringtone!

Today I'll be sharing some tips to create an easy pin up look! It doesn't require much effort or a lot of time to complete this look. It took me about 20 minutes including taking pictures for the blog.

Finish Look

First and foremost, start with your primer or sun screen as you wish. Today I used Elf Flawless Finish Foundation for the first time with my Beauty Blender. 


For a more natural finish, remember to always wet your sponge (and squeeze out the excess water) prior to foundation application. This will help your make up to blend more easily and less likely to look cakey.

BEFORE Foundation

AFTER Foundation

Like usual, tight line (I used MAC's Black Track Fluid Line) and apply eye primer. 


Start off with applying a light shimmery peach colour across your lid, focusing on the inner corner and centre of the lid. Use the eye shading brush for this step.

Shimmery Peach Eyeshadow

Use the blending brush with a matte dark brown colour to blend lightly across the outer corner and drag the colour inwards just a slight bit. After, use eye shading brush with the same matte brown and line on the outer corner of the lower lash line.


 Clean the brush with a towel/ tissue, use a shimmery beige colour and highlight the rest of the lower lash line. Blend with fingers on the lower lash line.


Slight wing cat eyeliner + mascara

Line your eyes using a stiff tip liquid eyeliner for easier winged eyeliner application. Apply mascara.


Bobbi Brown Lash Glamour Extreme Lengthening Mascara

Contour the sides of your face and the bridge of your nose using a large stippling brush and  a matte bronzer.

MAC 187SE Brush; NYC Sunny Bronzer

Apply a peachy blush on the apples of your cheeks and blend out. 

Benefit Coralista Blush (tester size); Sigma F40 Angled Brush


Before Lipstick

Apply your favourite red lipstick and there you go!

Revlon Colorburst Lipstick in 080 Coral

Finish Look

Thank you for your time and see you tomorrow!